Creating Release Notes with Apache Hop
Creating Release Notes with Apache Hop
Introduction
Managing software releases efficiently requires clear and well-structured release notes. Apache Hop, an open-source data orchestration platform, can be leveraged to automate and streamline the process of generating release notes.
However, note that you can also use different release note generators offered by the community or by GitLab itself. This guide simply demonstrates how you can use Apache Hop if you want to create release notes yourself—for example, if you need a specific layout or customization.
Why Use Apache Hop for Release Notes?
Apache Hop provides powerful ETL (Extract, Transform, Load) capabilities, making it an excellent choice for automating data extraction and transformation. By utilizing its workflow and pipeline features, you can:
- Extract issue tracking data (e.g., from Jira or GitLab)
- Transform the data into a structured format
- Generate and export formatted release notes (e.g., as Markdown in
milestone.md) - If you already use Apache Hop, there is no need to introduce new software dependencies
Setting Up GitLab CI/CD
To automate the generation of release notes in GitLab, you need to configure a GitLab CI/CD pipeline. This requires setting up the necessary variables and defining a .gitlab-ci.yml file.
You can also create a project or group access token in a similar way. This depends on your requirements, needs, and GitLab permissions.
GitLab Variables
Navigate to your GitLab profile and go to Edit Profile → Access Tokens. Now add a new token. I named mine PRIVATE_TOKEN. Add an expiration date if desired and select “API” as the scope.

Make sure you save it—you won’t be able to access it again. After creating your personal access token, it should look like this:

To use your access token in your CI/CD pipeline, add it to your project:
- Navigate to Settings → CI/CD → Variables → Add variable.
- Use
PRIVATE_TOKENas the key and paste the generated access token as the value. - Select “Masked” and “Hidden” for security reasons.
You can uncheck “Protected Variable” if you want to use it for non-protected branches.
Once configured correctly, it should look like this:

The variables
$CI_PROJECT_DIRand$CI_PROJECT_ID, which we will also need, do not need to be added manually. These are GitLab internal variables that are automatically available.
Now, let’s configure the .gitlab-ci.yml file.
.gitlab-ci.yml & Wrapper Scripts
To simplify the process, I include the generation process in my GitLab project. However, this project setup can be included in other projects as a submodule or checked out inside CI/CD jobs.
To generate milestone.md using Apache Hop, we must install Apache Hop in the CI/CD job. I use Alpine Linux and install Apache Hop as well as curl, as we need to request all merge requests and milestones of the project.
Here’s my .gitlab-ci.yml setup:
1
2
3
4
5
6
7
8
9
10
11
12
13
14
15
16
17
18
19
20
21
22
23
24
variables:
  HOP_VERSION: "2.12.0"
  OPENJDK_VERSION: "17"
  IMAGE: "alpine:latest"

stages:
  - test

create_markdown:
  stage: test
  image: ${IMAGE}
  script:
    - echo "Installing Apache Hop"
    - apk add --no-cache openjdk${OPENJDK_VERSION} curl
    - wget "https://downloads.apache.org/hop/${HOP_VERSION}/apache-hop-client-${HOP_VERSION}.zip"
    - unzip apache-hop-client-${HOP_VERSION}.zip -d /opt/
    - echo "Apache Hop installed successfully"
    - chmod +x /opt/hop/*.sh
    - chmod +x $CI_PROJECT_DIR/src/*.sh
    - sh start.sh $CI_PROJECT_DIR $PRIVATE_TOKEN $CI_PROJECT_ID
  artifacts:
    paths:
      - milestone.md
    expire_in: 1 week
Here, $CI_PROJECT_DIR (the project checkout directory) and $CI_PROJECT_ID (the project ID) are used inside the Apache Hop pipeline. A shell script start.sh is also executed with these variables
1
2
3
4
5
6
7
8
9
10
11
12
13
14
15
#!/bin/sh

CI_PROJECT_DIR=$1
PRIVATE_TOKEN=$2
PROJECT_ID=$3

sh /opt/hop/hop-conf.sh \
     --project-create \
     --project=markdown \
     --project-home=$CI_PROJECT_DIR

echo $PRIVATE_TOKEN
echo $PROJECT_ID

sh /opt/hop/hop-run.sh -j markdown -r local -f ${PROJECT_HOME}/src/main.hwf --parameters=PRIVATE_TOKEN=${PRIVATE_TOKEN},PROJECT_ID=${PROJECT_ID}
In this script, we first create the project using hop-config.sh. The project is named “markdown” and its home directory is set. Then, we start our workflow to generate the milestone.md file, which contains all merge requests associated with a milestone.
Workflow
Here, I want to illustrate what the workflow does in detail. As seen in the shell script above, I pass my PRIVATE_TOKEN, which is required for GitLab, along with the PROJECT_ID. My main.hwf file takes these parameters and uses the Shell Action to execute a script that requests all milestones in our project.
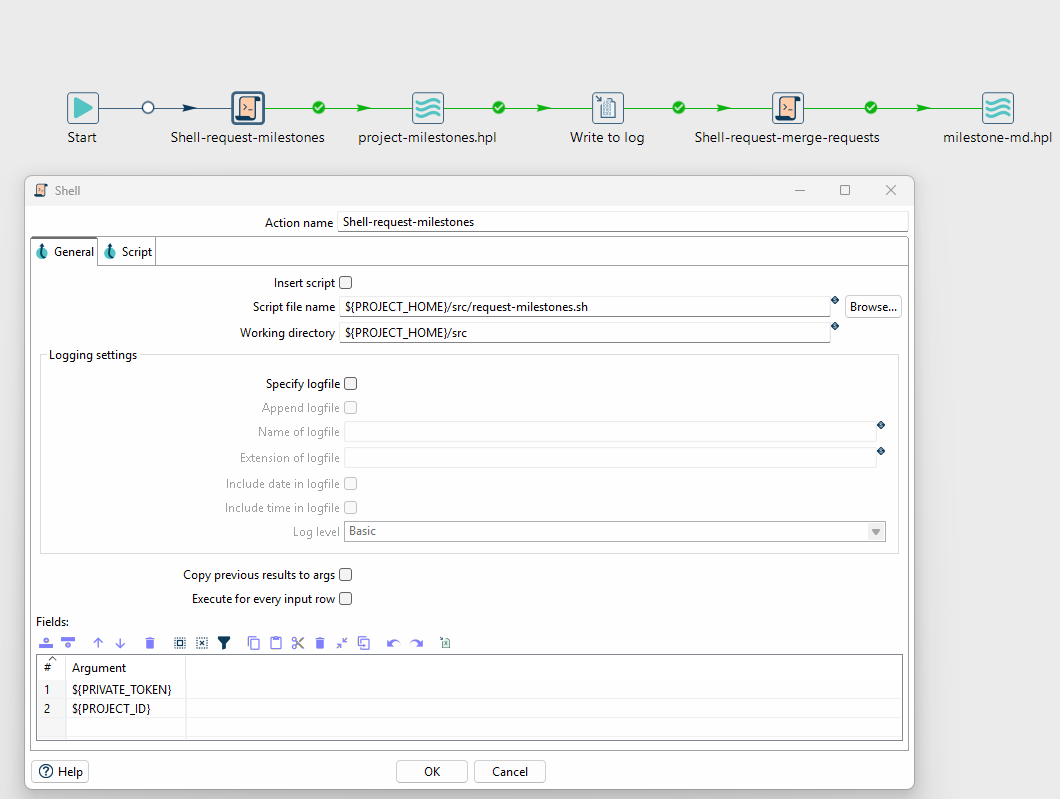
This is what the contents of the shell script look like:
1
2
3
4
5
6
#!/bin/sh

PRIVATE_TOKEN=$1
PROJECT_ID=$2

curl --header "PRIVATE-TOKEN: ${PRIVATE_TOKEN}" "https://gitlab.com/api/v4/projects/${PROJECT_ID}/milestones" > project-milestones.json
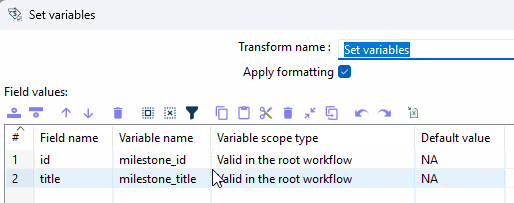
The received JSON is then processed in the next step, which takes place in the pipeline named project-milestones. 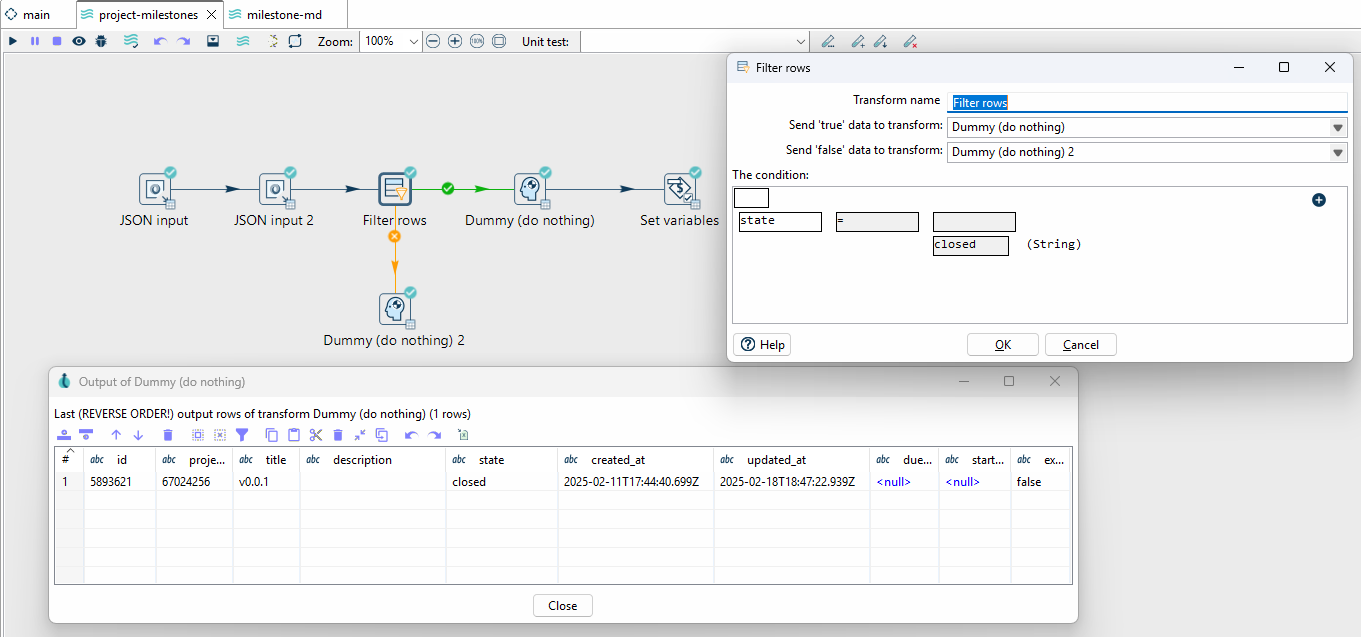 Here, I parse all relevant information from the JSON and store the “id” and “title” as variables.
When using the Set Variables transform, keep in mind that only one row can be set as a variable. I use the Filter Rows transform to retrieve only the milestone that has been marked as closed in GitLab. Depending on how many milestones have already been closed, this needs to be taken into account, and the logic should be adjusted accordingly.
Now that we have the milestone ID we want, we pass it back to a shell script and use curl to retrieve all merge requests that have this milestone set. The script looks as follows:
1
2
3
4
5
6
PRIVATE_TOKEN=$1
PROJECT_ID=$2
MILESTONE_ID=$3

curl --request GET "https://gitlab.com/api/v4/projects/${PROJECT_ID}/milestones/${MILESTONE_ID}/merge_requests" \
     --header "PRIVATE-TOKEN: ${PRIVATE_TOKEN}" > merge-requests.json
As before, we use the PRIVATE_TOKEN for the GitLab API and additionally pass our PROJECT_ID and MILESTONE_ID to query all merge requests.
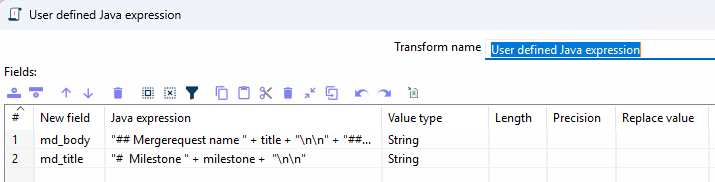
Once we have received the file, we can now create our final markdown document. To do this, we first parse all the information important to us from the JSON and use the ‘User defined Java expression’ transform to create the layout of the markdown file
This could look something like this
If you click on the Java expression field, an editor will open.
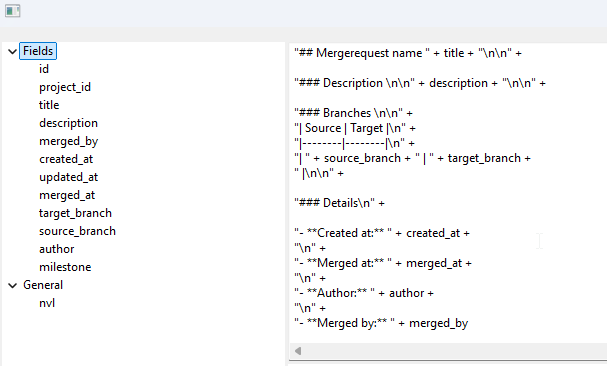
We concatenate the input fields in the way we want them to be displayed later in our markdown. Here is the part of the header of our markdown file.
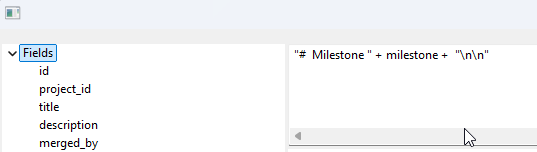
Afterwards, the streams are split. This is done because we only want the header once in our markdown file, and it should appear at the very beginning.
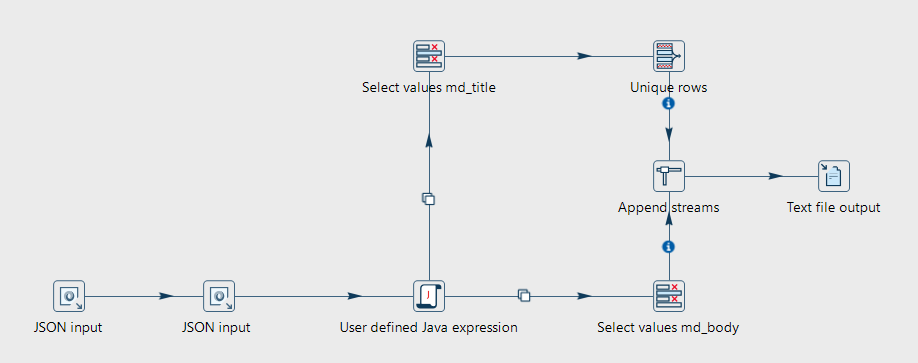

If we didn’t do this, the header would be included again with each merge request. This happens because we have more than one merge request, and after parsing, multiple rows would be generated.
When using Append Streams, it is important to ensure that the naming of the fields you want to append is the same.
The markdown file
This is what the final version of the markdown file looks like.
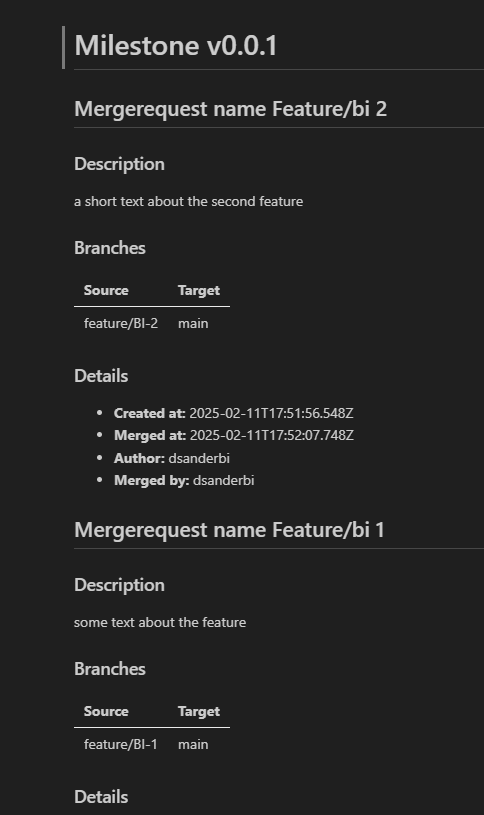
The header with Milestone v0.0.1 is displayed at the very top, and for each merge request, we have the name as the title along with the description used in the merge request, as well as the branches from which the merge request originated and where it was merged. Additionally, we have shown when changes were made to the merge request or when it was created.
Final Thoughts
We have demonstrated how we can create custom release notes, provided they were merged via a merge request and attached to a milestone. However, some things should be pointed out. First, note that this was just a very simple example on how you can create your own custom release notes. Instead of using merge requests you can also request all commit messages and create the release nots or other files using them. Further i should point out that if you use this in that way those release notes will not be included in your repo. This may be a advantege or disadvanted for you dependent on your workflow and repository adaministration. For example, you get the idea that you want to automate your changelog creation this way. Note here that you would need to commit this file after the creation! As it is done in other tutorials. However i personaly dont like to automate the generation of a changelog since it requires a extra commit in the repo but for release notes that i can append to the gitlab release page via a API call i think this is a good idea especially if i can custom the file as i like or i need in the first place.
I hope you enjoyed the blog post and you got inspired to create your own custom made release notes with Apache Hop.
If you have any suggestions or thougts dont hesitate to contact me via mail.